Monday 28 June 2010

First update in a while - London Zoo.

1 comments
Sorry for the delay between posts -- simply put, I haven't been out shooting much at all since the Colour Spectrum project. In fact, the only time I really properly picked up my camera was when we went to London Zoo for my birthday.

I haven't uploaded all my pictures from the day yet, as it's tough to sort through them and find the really good ones, considering a) most of them were shot through a sheet of glass which caused distortion and reflection, and b) I forgot my longer zoom lens so the animals in big open enclosures were all shot at 50mm -- way too far away :(

Anyway, I have uploaded a few from the day and this is what I have:

Llama

Haha, just look at that guy's underbite. I was torn between trying to get in close to shoot him, and trying to stay out of the spit radius.

Bird-eating Spider

My loving, wonderful, thoughtful and attentive boyfriend Ste beckoned me over to this cage, pointed at this hideious beast and said "check that out!" then scarpered while I was going "BLARGH, EWW, BURGH, YUCK."

Bug

Cool bug but I should have closed the aperture a teensy bit to help with the DOF.

Yucky Spider

DISGUSTING thing, just horrendous. There were about eight of these in one cage and actual flies in their webs. This thing reminds me of the hybrid human-alien Xenomorph from Alien: Resurrection. Just made my skin crawl.

Cool shot though.

I also captured tons of shots of reptiles, amphibians, gorillas, lions, a komodo dragon, and generally everything you expect to see in a zoo. It might seem a little quaint to go to the zoo for my birthday but we had an amazing day and were thoroughly knackered when we got home.

In other news, Ste bought me a tripod for my birthday which I have yet to try out yet, but one experiment I really want to try out, is to take the whole kit out on an evening when the tide is out just as it starts to get really dark -- what I'm aiming for is the kind of smoky/milky water effect you get from long exposures, but without filters the only way I can achieve this is if there is very little light out. Birling Gap, which isn't far from me, has quite a rocky beach when the tide is out, so that's where I'm going to go. The tide and sunset are perfectly synchronised on Saturday but naturally I am busy that night so I don't know when else I'll be able to get out.

Oh, and also I was one of the lucky (read: sad) people who queued for and got their hands on an iPhone 4 on Thursday so that has been occupying me a fair bit recently. :P

Monday 7 June 2010

Weekend Mini-Project -- Colour Spectrum (with some trippy edits)

0 comments
This post is going to be a little different to my usual ones, in that it will be image-heavy and include brief "how I did it" descriptions focusing on the post-processing and not the camera settings.

For the most part I like to keep my post-processing fairly simple. I adjust the levels, a little in curves, sharpen and crop and that's about it, apart from the occasional monochrome (aka "mono" -- black-and-white) conversion.

But sometimes it's fun to play with the trippier side of photo editing. I use an open-source program called GIMP which is totally free and a decent, powerful alternative to Adobe Photoshop, which is insanely expensive. GIMP includes most of the tools that Photoshop does which means there's a lot to learn and play with, but if you know how to use it is just as effective, in my opinion.

So, after leaving my camera to collect dust for a week after coming back from France, I decided I needed to set myself a little project to motivate myself a little. While bigger, long-term projects like the 365 one served to demotivate me through too much pressure, mini-projects seem to be quite fun and satisfying. And the one I set myself this weekend seemed on the surface to be an easy one -- I just needed to take seven shots, incorporating each colour of the spectrum in whatever way I saw fit.

Naturally nothing is as easy as it seems and despite myself I was quite busy this weekend -- in the end I only went out once just for half an hour and didn't actually shoot every colour, so I had to get a little inventive to complete the project.

Red

A very simple edit here which I will cover in more detail in a later post. First I adjusted the levels, then made a copy of the shot and converted it to mono. I copied and pasted the mono shot as a new layer on top of the colour one, then added a layer mask. Then I selected the brush tool, and selecting the colour as black I painted over the postbox, essentially erasing the mono layer to reveal the colour underneath. Once this was done I flattened the image and saved.

Orange

I had this exact edit in mind when I took this shot. The house itself was very well kept and clean-looking, but that carrier bag outside was a weird juxtaposition, and that it happened to be the colour I needed for my Orange shot was just perfect. I did the same edit process as above for this shot, then in addition added a vignette -- again something I will cover in a later post.

Yellow

The only edits I did here were the basic levels and sharpening. I could have done more with the composition of this shot I think.

Green

Again just levels and sharpening. This shot didn't occur to me as the "green" until I opened my mind a little -- the subject is the bee but the green is still the dominant colour. Also incidentally, bees are really erratic motherfuckers and I don't know how people are able to successfully shoot them with any regularity.

Blue

This little piece of confetti almost didn't get shot at all -- I saw it out of the corner of my eye near the town hall on my way home, and was going to keep walking but made myself stop, change lenses, turn back and shoot. The edit I did here was a weird one -- I used the Filter Pack in GIMP to add a blue filter to the shot without completely recolourising everything. I don't know how it works and it was very experimental from my perspective.

Indigo

Indigo is a weird colour isn't it? To me, indigo and violet are just fancy-pants way of saying "purple". Anyway, the original of this shot is a very different colour -- the bush itself is a reddish-maroon colour. I went into the Hue-Saturation tool, selected the Red channel and changed the hue until it was a suitable blue-purple colour.

Violet

Nothing but levels on this, not even any sharpening. I actually really love this shot.

So there it is -- my first successful mini-project! It's always good to discover new, weird and wonderful processing techniques even if you don't intend to use them too much.

Friday 4 June 2010

Paris and Roland Garros - the Learning Experience

0 comments
It goes pretty much without saying that I had an amazing time in Paris. The weather was good (apart from a day of rain at the tennis -- malheureusement), the company was wonderful, the apartment was bijou, the food was... well, cheesy -- all in all I had a blast.

I definitely approached this holiday with a slightly different perspective than I did last year's. While I was ultimately there for the tennis (and I made sure my photography didn't get in the way of that) I certainly had a few other things going on in my mind.

1) Would my new lens really get me as close as I wanted?

Ok so I wasn't peering up the players' nostrils like some of the pros and their amazing lenses would have been, but considering we were up in the stands I was surprised and delighted at the zoom level I achieved.

DSC04663
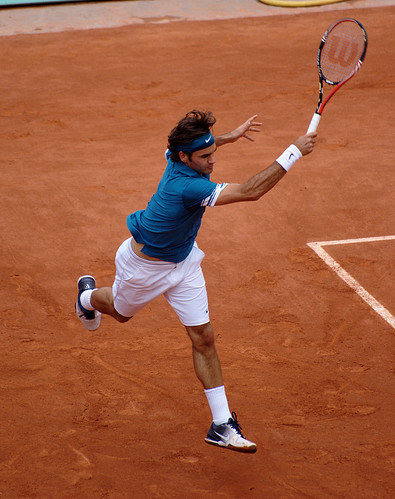
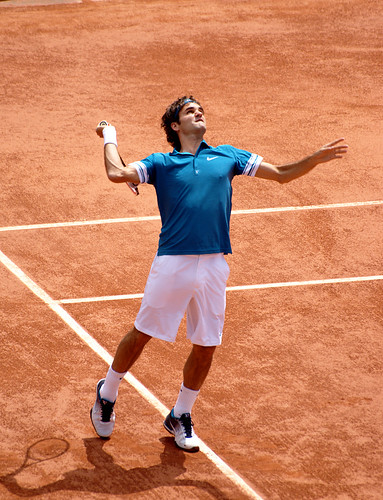
Roger Federer (aka future husband)

DSC04431
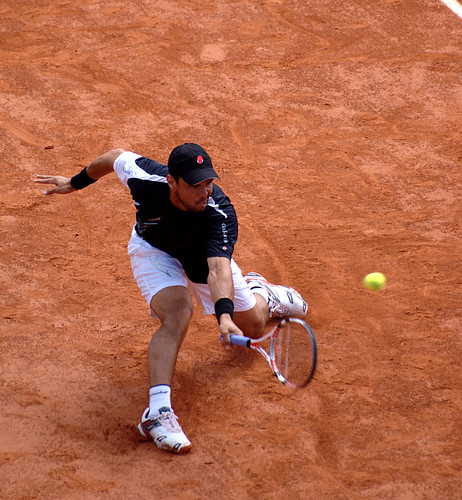
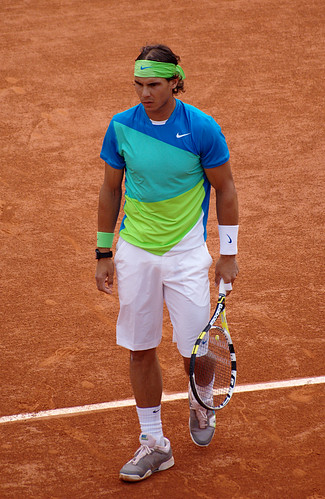
Rafael Nadal (aka Imogen's future husband)

Much to Imogen's delight the zoom was enough to get some very pervy shots of Rafa, changing his shirt, picking his shorts out of his bum as he does, etc. So yes, the zoom level was sufficiently awesome.

2) Would I be able to find the right settings to get decent shots?

I had a feeling going in that shooting in Shutter Priority wouldn't quite cut it in the sporting conditions. The lens I took is not a fast lens -- fully zoomed in the maximum aperture is only f/5.6 -- so in order to get the shutter speed I desired I needed to turn up the ISO. I have a pathological fear of noisy shots but as it was still fairly light and the court was textured enough to hide the noise, I went for it anyway, and shot in full manual -- the first time I'd done so for an extended period of time.

DSC04356
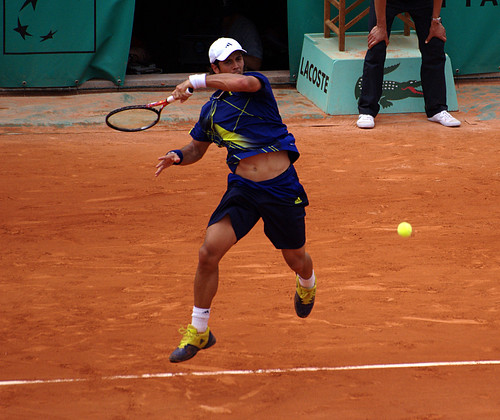
Fernando Verdasco and his chiselled, chiselled abs

What was most interesting was that in the conditions it was really difficult to see the shots on the LCD to determine whether they were correctly exposed. So, another first for me, I changed the preview screen to show the histogram instead. As long as the histogram was either evenly spread, or at least bunched up towards the middle, I was happy with the exposure.

And the third "first" for me was that I used the camera's metering mode properly for the first time. Either on the LCD or within the viewfinder, the meter shows me the exposure bias for that shot with the settings I was using: if it was 0.0 or thereabouts, it was correctly exposed -- between 0.0 and +2.0 was over-exposed, and -2.0 to 0.0 was under-exposed. Using this I was able to adjust my settings "on the fly" much more, which was important on the days when there was occasional cloud cover -- you'd be surprised how many adjustments have to be made when the sun goes behind a cloud.

DSC04711
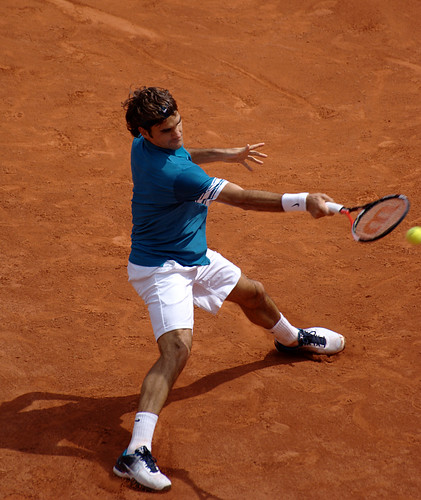
Federer in the sun - f/5.6, 1/1250sec, ISO100

DSC04732
Federer in cloud cover - f/5.6, 1/800sec, ISO400

What this experience happily taught me is that, if the conditions demand it, I absolutely am able to choose the correct settings on the fly and end up with a perfectly satisfactory shot. Me being me, I am still not 100% happy with them, but I know it's more of a limitation of my budget -- could I afford faster lenses, I'm confident I would have taken crisper shots.

3) Would the DSLR with optical zoom lens be that much different from the digital zoom of the high-end point-and-shoot cameras?

Fuck yeah it would.

DSC04675
Alejandro Falla clay-sliding en route to losing to Federer

NON-TENNIS SHENANIGANS

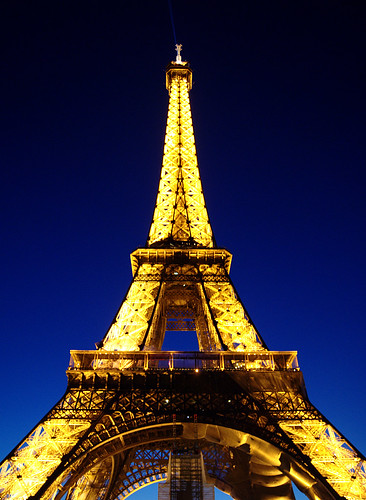
We did go sight-seeing a little too -- our apartment was less than 10 minutes walk from the Eiffel Tower so we went to have a look on our first evening there.

Let me just state for the record that the Eiffel Tower by day is pretty shocking. It's very rusty, they've built a massive skate ramp at the base of it, and generally speaking it's a little kitsch.

However at night, it becomes something else altogether -- they light it up (of course) and if you catch it when there's still a little blue in the sky it really does look amazing.

DSC04283

You can see the skate ramp bottom-middle -- it's a shame really, but they built it for some world record free-fall skating attempt, so maybe they'll dismantle it?

So I'm gonna toot my own horn again. Given that we were just wandering around, I did not use a tripod for the above shot, which was taken in manual mode at a shutter speed of 1/4sec. This is extremely slow. Given the speed I am very, very pleased with myself for getting this result hand-held. Likewise, the following shot was taken at 1/3sec, even slower than the above:

DSC04278

My fear of noise, which is much more obvious on dark shots, prevented me from upping the ISO and shutter speed accordingly. So I just grasped the camera in one hand, the lens in the other, breathed out and pressed down.

DSC04261

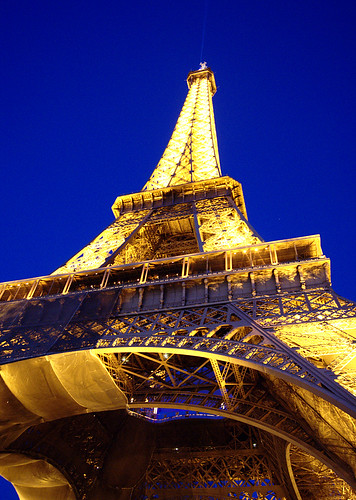
For this shot I was experiencing some severe vertigo looking up at the structure -- I had to go down on one knee to avoid falling over backwards -- so the fact that I got a clear shot at 1/5sec is, to me, fairly remarkable.

On the whole, taking my camera with me gave the trip an additional angle from which to enjoy myself, and I really did. I feel like I've learned a lot from a practical perspective, not just in theory, which ultimately is more valuable in the long run.

On the flipside, I was so surgically attached to my camera for that week that I haven't picked it up once since I got back -- oops!