Monday 29 March 2010

Jargon: The Exposure Triangle Part II -- Shutter Speed

0 comments
So we've talked about Aperture and its role in the Exposure Triangle, and how to create bokeh using shallow depth of field. The next part of the triangle is the shutter speed.

Where aperture is the size of the opening which allows light into the lens, the shutter speed is the length of time your camera's sensor is exposed to the light. Use faster shutter speeds to capture instant moments and sharp images where the subject (or you yourself) is moving.

DSC00744

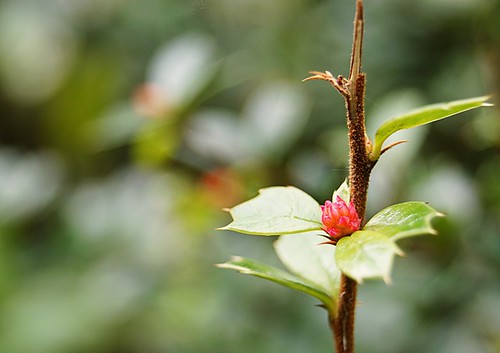
In this shot the wind was blowing a little, but where the exposure is set to 1/250th of a second, there is no movement blur.

If the light is low, the shutter speed will need to be increased in order for enough light to fall on the sensor and your shot to be correctly exposed. You can balance this somewhat by opening up the aperture wider (and increasing your ISO... more on this in a later post).

fly u foolz

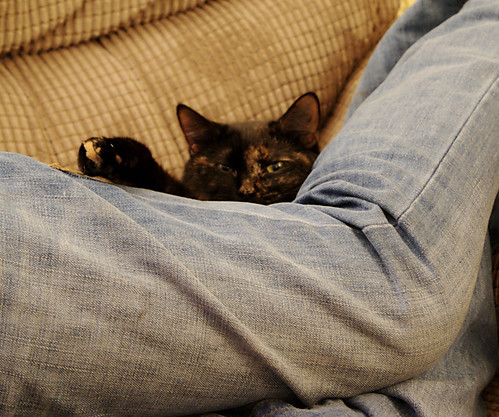
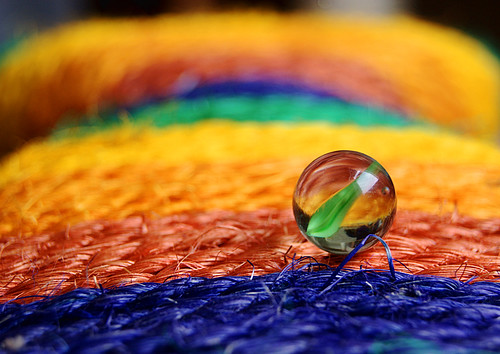
This shot was taken in the evening in my living room -- we only have two 60-watt uplighters lighting the room, and as I had the camera in Aperture Priority mode, the camera automatically chose an exposure of 0.5 seconds. This may not seem a lot but if you're shooting a moving subject or hand-holding the camera it can be an age. I had my elbows propped on the table to reduce hand-shake.

So for moving subjects or bright-light situations, a faster shutter speed is required. You can set your camera to Shutter Priority mode to control the shutter speed and let the camera work out the other particulars.

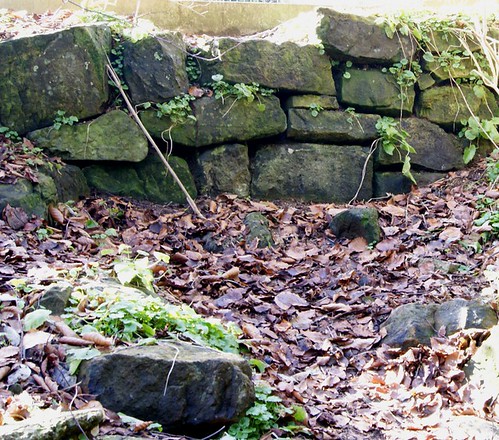
There will also be instances where you are actually aiming for a longer exposure; because you want to illustrate movement, or during night-time shooting, shooting fireworks or similar.

10/365

Here I was actually deliberately trying to capture the movement of the carousel so I switched to shutter priority mode and stopped down to 1/8th of a second. I wanted to go for longer but the shots were coming out way over-exposed even with the smallest aperture. Normally in long-exposure situations you absolutely MUST use a tripod (to avoid movement blur due to hand-shake) but miraculously I managed to stay still enough for this.

So, to capture crisp blur-free shots, a faster shutter speed is required (and wider aperture to compensate the light). To illustrate movement or shoot outdoors, a longer shutter speed is needed.

Next jargon post will be on ISO.

Thursday 25 March 2010

Improvements So Far

0 comments
So I guess it's been about six weeks since I started out and already I have noticed my own improvement. The first time I went out with a specific intention to get some shots, I came back and was happy with the results -- but now I look back at that first shoot and hate every single capture.

DSC00341

Blech! What the hell is going on here? No definitive subject, totally overexposed, generally awful.

Even the shots I'm producing now, which I like a lot more, I believe I will go back again in a few weeks and hate them all as well. But at least I have a little better idea of what makes a good shot; composition, exposure, post-processing, etc.

3/365

This shot is much, much better. Well-exposed, great colours, nice composition -- I've had some good feedback on this shot (and quite a few or my more recent ones) which is really encouraging.

The most important thing for a beginner is to shoot, shoot, shoot -- and to get as much feedback as possible. Sites like Flickr are good for amateurs to share their shots but you have to join the right groups and add your shots to the group pools, otherwise nobody will see them. Also community forums like The Photography Forum will always give honest feedback and tips on what you need to do to improve. I recently started a 365 Project, which just means you have to add a shot a day for one whole year to your portfolio. You don't have to limit yourself to one shot overall, of course! There is no central theme, no rules to follow as such, just that you add one shot a day to the project. I personally started this as a means to get myself shooting every single day, and to discipline myself to be a bit more creative.

And of course, you must educate yourself. Learn what your camera settings are, read tutorials and how-to's on shot-taking and post-processing.

Happy snapping. xxx

Jargon: The Exposure Triangle Part I - Aperture (and Bokeh)

0 comments
There are a million blogs and a million articles on the web that will explain these terms in more eloquent or technical ways than I can, but I will give it my best shot.

When taking any photograph, the first consideration has to be the exposure. The exposure is exactly that: how well the camera's sensor was exposed to the light at the moment the shot was taken. There are three main things to consider when aiming for the right exposure: Aperture, Shutter Speed, and ISO; known collectively as The Exposure Triangle.

Aperture

Aperture was, for me, the more confusing term when I first started out. The aperture setting controls the size of the lens opening to allow more or less light into the camera. If you consider your camera lens to be like the human eye, the aperture would be the size of the pupil. Bigger = more light, smaller = less light.

As well as controlling the amount of light let in, the aperture also controls something called Depth of Field; that is, the area or amount of the shot that is in focus. A narrow depth of field means that only a small area of the shot is sharply in focus:

DOF Fence

See how just a small part of the fence is sharp, but the foreground and background are all out of focus? That's what a wide aperture will do to a shot, especially one where your focus is very close.

A smaller aperture limits the amount of light coming into the camera, but also ensure more of the shot is in focus:

DSC00315

Here you can see the sundial in the foreground is just as in-focus as the trees and sky in the background.

Ok so here's where it gets confusing, and why it is this way, I couldn't tell you. To select a larger aperture on your camera, you have to choose a smaller number, and to select a smaller aperture, you choose a higher number.

Narrow depth of field = smaller number = wider aperture.
Wide depth of field = larger number = narrower aperture.

In order for your shot to be correctly exposed, if you limit your aperture you must then slow your shutter speed to allow enough light in to the camera. I'll go over shutter speed in more detail in a later post.

If you select your camera's Auto mode, you will have no control over any of the settings; however all DSLR cameras and even some Point and Shoot models have an Aperture Priority mode. This will allow you to select the aperture size you want, and the camera will then work out the optimum shutter speed to correctly expose the shot. I currently shoot almost exclusively in Aperture Priority mode.

Bokeh

Ahh, bokeh. I've come to realise from my reading that bokeh is a notion that is more pleasing to amateurs, and the more experienced photographers out there don't really consider it that much.

The word "bokeh" (pronounced "bock-eh", not "bow-kay") is a Japanese word and it refers to the part of a photograph that is out of focus. A lot of people, myself included, will compose a shot not just to capture a subject, but also to capture some attractive bokeh in the background. I find it pleasing to the eye; in the professional world I don't know how much weight it carries. To achieve bokeh, one must open up their aperture really wide when photographing a foreground subject; the subject will be in focus, the background out of focus, and this blurry background is the bokeh.

DSC00572

See how the cute little flower is sharp and then there's loads of out-of-focus jazz in the background? That background jazz is bokeh. The best bokeh, in my opinion, is created with a really narrow depth-of-field (the capability for which, my current lens just doesn't have) and contrasting colours or lights in the background. Bokeh itself can be an artistic device, or can be used to highlight the subject of the shot even more.

Spring Bokeh

My next Jargon post will be about shutter speed.

Happy snapping.
xxx

Monday 22 March 2010

Helpful Websites

0 comments
Ok, it's been quite a while since my last post and there is good reason for that. I realised that there was no point in a total newbie trying to explain to other newbies what any of the jargon meant. So I have spent the last month reading, reading, reading, every forum and tutorial page I could find.

So before I crack on with it in upcoming posts, let me point you to the blogs and forums which have helped me the most.

1) The Pioneer Woman -- Ree Drummond has lately taken the blogosphere by storm by being one of the first bloggers to transcend the medium into the really real world. She had a cookery book published last year, has made tons of TV appearances, is now writing a book detailing her journey from city girl to ranch wife (which last week was optioned by Columbia Pictures and rumour has it Reese Witherspoon is on board) as well as winning Weblog of the Year more than once. Her photography page was very inspiring to me and she does explain in layman's terms what a lot of the jargon means.

2) The Photography Forum -- this forum is populated with photographers whose experience ranges from total novice (me) to experts and professionals. There are sections for critique, for shot-sharing, for beginners and professionals alike. The folk there are incredibly friendly and very, very honest in the most helpful way. I have learned a lot from them already, especially when it comes to what gear to buy and use.

3) The Digital Photography School -- this thoroughly AMAZING website has given me so many tips and also really encouraged me to keep on. There is an article about practically any photography topic you can imagine, including an extensive "How to Photograph" section if you have a particular theme in mind and want some tips on how to make it happen.


There is a WEALTH of information on the web and while plenty of folks might tell you to buy a book and read up, I'm not 100% convinced that's necessary.

Ok I will eventually get on to the jargon and terminology in an upcoming post. Happy reading!