Monday, 28 June 2010

First update in a while - London Zoo.

1 comments
Sorry for the delay between posts -- simply put, I haven't been out shooting much at all since the Colour Spectrum project. In fact, the only time I really properly picked up my camera was when we went to London Zoo for my birthday.

I haven't uploaded all my pictures from the day yet, as it's tough to sort through them and find the really good ones, considering a) most of them were shot through a sheet of glass which caused distortion and reflection, and b) I forgot my longer zoom lens so the animals in big open enclosures were all shot at 50mm -- way too far away :(

Anyway, I have uploaded a few from the day and this is what I have:

Llama

Haha, just look at that guy's underbite. I was torn between trying to get in close to shoot him, and trying to stay out of the spit radius.

Bird-eating Spider

My loving, wonderful, thoughtful and attentive boyfriend Ste beckoned me over to this cage, pointed at this hideious beast and said "check that out!" then scarpered while I was going "BLARGH, EWW, BURGH, YUCK."

Bug

Cool bug but I should have closed the aperture a teensy bit to help with the DOF.

Yucky Spider

DISGUSTING thing, just horrendous. There were about eight of these in one cage and actual flies in their webs. This thing reminds me of the hybrid human-alien Xenomorph from Alien: Resurrection. Just made my skin crawl.

Cool shot though.

I also captured tons of shots of reptiles, amphibians, gorillas, lions, a komodo dragon, and generally everything you expect to see in a zoo. It might seem a little quaint to go to the zoo for my birthday but we had an amazing day and were thoroughly knackered when we got home.

In other news, Ste bought me a tripod for my birthday which I have yet to try out yet, but one experiment I really want to try out, is to take the whole kit out on an evening when the tide is out just as it starts to get really dark -- what I'm aiming for is the kind of smoky/milky water effect you get from long exposures, but without filters the only way I can achieve this is if there is very little light out. Birling Gap, which isn't far from me, has quite a rocky beach when the tide is out, so that's where I'm going to go. The tide and sunset are perfectly synchronised on Saturday but naturally I am busy that night so I don't know when else I'll be able to get out.

Oh, and also I was one of the lucky (read: sad) people who queued for and got their hands on an iPhone 4 on Thursday so that has been occupying me a fair bit recently. :P

Monday, 7 June 2010

Weekend Mini-Project -- Colour Spectrum (with some trippy edits)

0 comments
This post is going to be a little different to my usual ones, in that it will be image-heavy and include brief "how I did it" descriptions focusing on the post-processing and not the camera settings.

For the most part I like to keep my post-processing fairly simple. I adjust the levels, a little in curves, sharpen and crop and that's about it, apart from the occasional monochrome (aka "mono" -- black-and-white) conversion.

But sometimes it's fun to play with the trippier side of photo editing. I use an open-source program called GIMP which is totally free and a decent, powerful alternative to Adobe Photoshop, which is insanely expensive. GIMP includes most of the tools that Photoshop does which means there's a lot to learn and play with, but if you know how to use it is just as effective, in my opinion.

So, after leaving my camera to collect dust for a week after coming back from France, I decided I needed to set myself a little project to motivate myself a little. While bigger, long-term projects like the 365 one served to demotivate me through too much pressure, mini-projects seem to be quite fun and satisfying. And the one I set myself this weekend seemed on the surface to be an easy one -- I just needed to take seven shots, incorporating each colour of the spectrum in whatever way I saw fit.

Naturally nothing is as easy as it seems and despite myself I was quite busy this weekend -- in the end I only went out once just for half an hour and didn't actually shoot every colour, so I had to get a little inventive to complete the project.

Red

A very simple edit here which I will cover in more detail in a later post. First I adjusted the levels, then made a copy of the shot and converted it to mono. I copied and pasted the mono shot as a new layer on top of the colour one, then added a layer mask. Then I selected the brush tool, and selecting the colour as black I painted over the postbox, essentially erasing the mono layer to reveal the colour underneath. Once this was done I flattened the image and saved.

Orange

I had this exact edit in mind when I took this shot. The house itself was very well kept and clean-looking, but that carrier bag outside was a weird juxtaposition, and that it happened to be the colour I needed for my Orange shot was just perfect. I did the same edit process as above for this shot, then in addition added a vignette -- again something I will cover in a later post.

Yellow

The only edits I did here were the basic levels and sharpening. I could have done more with the composition of this shot I think.

Green

Again just levels and sharpening. This shot didn't occur to me as the "green" until I opened my mind a little -- the subject is the bee but the green is still the dominant colour. Also incidentally, bees are really erratic motherfuckers and I don't know how people are able to successfully shoot them with any regularity.

Blue

This little piece of confetti almost didn't get shot at all -- I saw it out of the corner of my eye near the town hall on my way home, and was going to keep walking but made myself stop, change lenses, turn back and shoot. The edit I did here was a weird one -- I used the Filter Pack in GIMP to add a blue filter to the shot without completely recolourising everything. I don't know how it works and it was very experimental from my perspective.

Indigo

Indigo is a weird colour isn't it? To me, indigo and violet are just fancy-pants way of saying "purple". Anyway, the original of this shot is a very different colour -- the bush itself is a reddish-maroon colour. I went into the Hue-Saturation tool, selected the Red channel and changed the hue until it was a suitable blue-purple colour.

Violet

Nothing but levels on this, not even any sharpening. I actually really love this shot.

So there it is -- my first successful mini-project! It's always good to discover new, weird and wonderful processing techniques even if you don't intend to use them too much.

Friday, 4 June 2010

Paris and Roland Garros - the Learning Experience

0 comments
It goes pretty much without saying that I had an amazing time in Paris. The weather was good (apart from a day of rain at the tennis -- malheureusement), the company was wonderful, the apartment was bijou, the food was... well, cheesy -- all in all I had a blast.

I definitely approached this holiday with a slightly different perspective than I did last year's. While I was ultimately there for the tennis (and I made sure my photography didn't get in the way of that) I certainly had a few other things going on in my mind.

1) Would my new lens really get me as close as I wanted?

Ok so I wasn't peering up the players' nostrils like some of the pros and their amazing lenses would have been, but considering we were up in the stands I was surprised and delighted at the zoom level I achieved.

DSC04663
Roger Federer (aka future husband)

DSC04431
Rafael Nadal (aka Imogen's future husband)

Much to Imogen's delight the zoom was enough to get some very pervy shots of Rafa, changing his shirt, picking his shorts out of his bum as he does, etc. So yes, the zoom level was sufficiently awesome.

2) Would I be able to find the right settings to get decent shots?

I had a feeling going in that shooting in Shutter Priority wouldn't quite cut it in the sporting conditions. The lens I took is not a fast lens -- fully zoomed in the maximum aperture is only f/5.6 -- so in order to get the shutter speed I desired I needed to turn up the ISO. I have a pathological fear of noisy shots but as it was still fairly light and the court was textured enough to hide the noise, I went for it anyway, and shot in full manual -- the first time I'd done so for an extended period of time.

DSC04356
Fernando Verdasco and his chiselled, chiselled abs

What was most interesting was that in the conditions it was really difficult to see the shots on the LCD to determine whether they were correctly exposed. So, another first for me, I changed the preview screen to show the histogram instead. As long as the histogram was either evenly spread, or at least bunched up towards the middle, I was happy with the exposure.

And the third "first" for me was that I used the camera's metering mode properly for the first time. Either on the LCD or within the viewfinder, the meter shows me the exposure bias for that shot with the settings I was using: if it was 0.0 or thereabouts, it was correctly exposed -- between 0.0 and +2.0 was over-exposed, and -2.0 to 0.0 was under-exposed. Using this I was able to adjust my settings "on the fly" much more, which was important on the days when there was occasional cloud cover -- you'd be surprised how many adjustments have to be made when the sun goes behind a cloud.

DSC04711
Federer in the sun - f/5.6, 1/1250sec, ISO100

DSC04732
Federer in cloud cover - f/5.6, 1/800sec, ISO400

What this experience happily taught me is that, if the conditions demand it, I absolutely am able to choose the correct settings on the fly and end up with a perfectly satisfactory shot. Me being me, I am still not 100% happy with them, but I know it's more of a limitation of my budget -- could I afford faster lenses, I'm confident I would have taken crisper shots.

3) Would the DSLR with optical zoom lens be that much different from the digital zoom of the high-end point-and-shoot cameras?

Fuck yeah it would.

DSC04675
Alejandro Falla clay-sliding en route to losing to Federer

NON-TENNIS SHENANIGANS

We did go sight-seeing a little too -- our apartment was less than 10 minutes walk from the Eiffel Tower so we went to have a look on our first evening there.

Let me just state for the record that the Eiffel Tower by day is pretty shocking. It's very rusty, they've built a massive skate ramp at the base of it, and generally speaking it's a little kitsch.

However at night, it becomes something else altogether -- they light it up (of course) and if you catch it when there's still a little blue in the sky it really does look amazing.

DSC04283

You can see the skate ramp bottom-middle -- it's a shame really, but they built it for some world record free-fall skating attempt, so maybe they'll dismantle it?

So I'm gonna toot my own horn again. Given that we were just wandering around, I did not use a tripod for the above shot, which was taken in manual mode at a shutter speed of 1/4sec. This is extremely slow. Given the speed I am very, very pleased with myself for getting this result hand-held. Likewise, the following shot was taken at 1/3sec, even slower than the above:

DSC04278

My fear of noise, which is much more obvious on dark shots, prevented me from upping the ISO and shutter speed accordingly. So I just grasped the camera in one hand, the lens in the other, breathed out and pressed down.

DSC04261

For this shot I was experiencing some severe vertigo looking up at the structure -- I had to go down on one knee to avoid falling over backwards -- so the fact that I got a clear shot at 1/5sec is, to me, fairly remarkable.

On the whole, taking my camera with me gave the trip an additional angle from which to enjoy myself, and I really did. I feel like I've learned a lot from a practical perspective, not just in theory, which ultimately is more valuable in the long run.

On the flipside, I was so surgically attached to my camera for that week that I haven't picked it up once since I got back -- oops!

Wednesday, 19 May 2010

Camera Sensors and the Megapixel Myth

0 comments
A topical subject -- I've just had my sensor professionally cleaned, which led me to research the difference between dust on the sensor, dust in the viewing optics and dust on the lens... which in turn led me to research the specifics of what a sensor is, the different types of sensor you get, and the difference in quality from one to the next.

DUST OMG

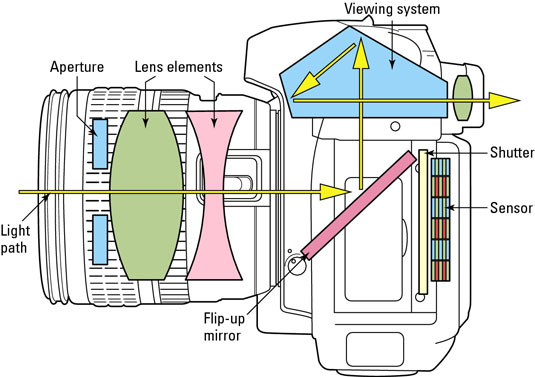
If you peer through the camera viewfinder and see dust, then the dust is NOT on your sensor. It will, 99% of the time, be on the reflex mirror, focusing screen or inside the viewfinder itself.


If you consider the diagram above, you can see that any dust on the illustrated path of light will show on the viewfinder. Generally speaking, while this is annoying, it's not the end of the world and won't show up on your images.

If you are seeing little dust spots on your image, it is probably dust on your sensor. Technically speaking it could be on your lens, but it would take a sizeable bit of dust on the lens to show in the final image, due to the way the focusing works. With every lens there's a minimum distance that it will focus at and anything closer gets blurrier and blurrier - well imagine how blurry a tiny dust spec would be right on the front lens element, and you get why it's unlikely to be a dusty lens if you can see it on the final image.

So, dust on the sensor. If you can see it on the viewfinder it won't show on the image - similarly if it's on the sensor you won't see it on the viewfinder. To check for dust on your sensor, mount a lens which can be set to 50mm or longer, close the aperture right up (f/22 or thereabouts), and shoot either a uniform blue sky, or a neutral white/grey surface like a wall. You might be able to see the spots on the LCD screen, or just pull the image off and look at it on your computer. It should be easy enough to spot -- if not, then you clearly have nothing to worry about. :)

Your camera's sensor is the equivalent to the film in film photography. It's the bit that is exposed to the light to generate the image (to continue the analogy further, if the sensor is akin to the film, a RAW image is akin to the negative, and the final JPEG is akin to the print). As such the sensor is incredibly sensitive and really if anything permanent happens to it, your camera is FUBAR.

Cleaning the sensor is a delicate matter. I googled and googled the phrase "sensor cleaning" to hell when my camera had dust, and most more experienced photographers will say it's something you can do yourself as long as you're careful and purchase the right tools. DISCLAIMER: You MUST get specialist tools to clean your sensor and you MUST follow the right procedures to avoid permanent damage. The general procedure involves first using a rocket blower to blast any loose bits of dust off the sensor -- once this is done, you can use a wet-clean technique to remove any bits which are stuck on. It's really important that you use the right tools for this - the right cleaning solution, the right swab -- if you mess up you could cause permanent damage to your sensor.

I could go into all the details but let's face it -- I am a klutz at the best of times. The other night, for example, I dropped a totally NOT hot casserole lid onto the worktop (didn't break thank god), then less than five seconds later, dropped my iPod on the kitchen floor. So when I realised I had dust on my sensor, I sent my camera off to be cleaned by a professional. It wasn't that expensive, and even though I was without my camera for three days, as someone who would have almost definitely ruined the sensor had I cleaned it myself, it was well worth it.

Sensor Size, Crop -vs- Full Frame, and Mega-Pixels

This fantastic post on the Photography Forum explains it much better than I can, PLEASE read it through, but I'll attempt to give my own summary perspective on it a little too.

Basically put, the larger your sensor is, the more light will fall on it. If there is not enough light, the sensor signal must work harder to detect what little light is there, which results in a "noisy" or "grainy" shot. You can manually boost the amount of light that hits your sensor by opening the aperture (a faster lens will help with this), slowing the shutter speed, or upping the ISO, which will make the sensor more sensitive to light -- but will still result in digital noise.

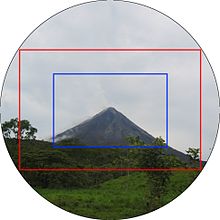
A full-frame camera will contain a sensor which is the equivalent size to a 35mm camera. As a brief aside I'll explain what that means to your field of view. If you're ever looking at lenses and see a phrase like "50mm on a crop sensor, which equates to 80mm in 35mm format", what they're referring to is the effective field of view; a shot taken at 50mm focal length on a crop sensor camera will produce the same result as a shot taken at 80mm on a full-frame camera. So you can extrapolate that to mean that 50mm on a full-frame camera will give a wider field of view.


Anyway, back to the point. The benefit of a full-frame camera is a wider field of view and better low-light performance. The flipside of that is how crazy-expensive they are. Nikon's biggest full-frame model, the D3X, retails at around £5000, whereas even the most expensive crop sensor cameras will usually come in less than £1000.

Now, on to what's known as the MEGAPIXEL MYTH. This is one that I was extremely gratified to read about, as it is kind of annoying hearing people bleat on about how many megapixels their camera has as if that makes it better - something I felt even before I was interested in photography.

A few weeks ago a friend of ours was considering switching away from iPhone to another phone model, and gave the reason that the camera that came with it had 14 megapixels. I still pride myself to this day that I was able to dissuade him from this before I even read up about the megapixel myth, purely by following the logic through in my own mind.

Enough boasting from me. The megapixel myth basically states a fallacy that more MP = better image quality. This is not necessarily true! My DSLR has a modest 10.2MP. Heck, Nikon have a full-frame camera model, the D3S, which has just 12.1MP. The truth is, a smaller sensor has a "sweet spot" when it comes to MP resolution, and if you try and cram more MP into a smaller sensor, you're going to end up compromising the image quality by creating sometimes-unacceptable levels of digital noise. So to Dan I said, it doesn't matter if your phone has a 14MP camera, the sensor is way too small to produce a decent-quality image.


Megapixels do matter to an extent, and especially in two particular areas: cropping and large-scale printing. If you're going to crop a huge amount out of a shot, more MP will allow you to do so and maintain image quality when the shot is scaled up to a bigger size. Similarly, if you're going to take a shot that's meant for, say, a huge wall poster or a billboard, I would imagine the MP count would be important there too.

There's a great article from the New York Times which explains the Megapixel Myth and also some genuine tests that were done to disprove it.

I hope this post has helped you to understand your camera's sensor a little better. Needless to say, the bigger sensor you can afford, the better the image quality will be, and megapixel size is NOT the effective comparison tool you think it is when considering which camera to buy next.

Wednesday, 12 May 2010

Off-Topic: Such Tweet Sorrow

2 comments
For the past five weeks I and many others have been riveted to our Twitter feeds, watching an innovative social "experiment" by the Royal Shakespeare Company and Mudlark Productions. "Such Tweet Sorrow" was a modern-day production of Romeo and Juliet acted out in real time over Twitter, with the six key characters of the play tweeting the storyline to the audience.

When I first heard about the concept I was dubious; the key elements of the play revolve around secrets, lies and misunderstandings -- I couldn't see how they could communicate all this through such a public medium as Twitter, let alone accomplishing all the gravitas and pathos Shakespeare did with his wonderful dialogue.

The six main characters were:

- Juliet Capulet, soon to be 16
- Tybalt Capulet, Juliet's 17-year-old brother (rather than cousin/kinsman)
- Jess Capulet aka Nurse - Juliet's 23-year-old sister
- Romeo Montague, 19
- Mercutio, 19, Romeo's best friend/foster brother
- Laurence Friar, aka Larry, 38, local café owner and soft drug dealer.

The producers were also online, and one supplementary cast member added to the fray a little later was Jago Mosca, a local youth whose addition, in my opinion, was a genius move by Mudlark - as a sneaky observer, he provided much-needed between-the-lines insight in the form of blog posts.

The production got off to an oddly mixed start for me - the first two weeks were spent vociferously establishing the family feud, with all characters being less-than subtle about their hatred for the other camp. The reason for the feud itself was a little shaky - something about a car crash where Mrs. Capulet was killed, Mr. Montague was driving, and Mr. Capulet was so incensed with rage after finding out they had been having an affair that he beat Montague within an inch of his life, causing him to lose an eye.

It was a rocky start, with some followers blogging some thoughtful (if controversial) critique about the characters' tendencies to be a little over the top ("show, don't tell"). However the producers were very open to critique from the followship, and weekly cast meetings took place after which it was plain to see the positive effect the fans were having on the production.

It was clear from the start that the audience immersion was going to be a key point in the success of the production, and no character managed that better than Mercutio. His early links to pictures, audioboos and videos of himself and Romeo out on the town established his character brilliantly, his games of #uploadthatload (where he and Romeo attempted to take sneaky pics of girls' bums and boobs without the girls seeing) and #gamesattheoffice (where he encouraged his followers to make up games to make the time at work go by faster) got the audience involved in a huge way, and he quickly earned himself a massive following, myself included, who dubbed themselves #teammercutio and #mercutiogroupies. After Romeo was grounded by his father, Mercutio's loneliness spilled out onto Twitter and Youtube when he posted a hilarious video of himself miming to Eric Carmen's All By Myself. He was also the first to regularly tweet in character back to the followers, flirting with the girls and getting us all on board. The fan response to him was so strong that it even prompted a huge (and unsuccessful) #savemercutio campaign where the fans begged the producers to let Mercutio bow out in some way that didn't involve his violent and untimely death. Even Mercutio's final hours were hugely interactive, with his final tweet being a shout-out to the #mercutiogroupies (prompting fangirl tears heard the world over). It's my firm belief that without Mercutio, Such Tweet Sorrow could not have had the fanbase it has had.

That's not to say the other characters didn't play their own huge part in making the production as successful as it was. The real turning point for me was the night of the masked ball at the Capulet residence; a stroke of genius prompted the producers to have the Friar create online playlists on Last.fm and Spotify, with Juliet tweeting and Facebooking the start time and encouraging everyone to listen to the playlist from then. It was never going to synchronise exactly due to Spotify adverts and the like, but it did serve to bring all the followers online at one time and multiple picture posts and audioboos throughout the night really set the scene. When the star-crossed lovers eventually clapped eyes on each other the fan reaction was huge (Juliet's "ABORT! ABORT! He's walking over here!" was one of my favourite tweets of the whole play). The inclusion of these real-time events really helped with the audience immersion, even to the point that a simple (if competitive) ping-pong tournament pitting Tybalt against Mercutio had waves of Mercutio fans convinced that day would be his last (it wasn't).

The production hasn't been without its flaws. On Juliet's birthday she received a present of a new mobile phone, and waxing rhapsodic about the precise make, model and features of the phone prompted cries of indignation that product placement was inappropriate and spoiled the experience. I personally wasn't that fussed - Juliet made a maximum of maybe four tweets about it in a short space of time and then never mentioned it again. Juliet herself came under some very severe criticism for losing her virginity to Romeo the night she met him, being completely self-involved, posting a video of places they had "done it" and generally being everything most 16-year-olds are these days. Also the audience was forced to suspend disbelief about certain elements such as tweets going ignored or missed, or emergency services not being called until the very last minute when it was far too late.

The biggest flaw for me, unfortunately, was the finale. It all started at 06:00 UK time on a Wednesday morning, which was incredibly inconvenient for the international followers, some of whom had been committed since day one and were unable to participate due to the time difference. Also despite the actors giving it their all in the final hours, the plot itself was full of holes -- Juliet took propofol, a strong anaesthetic, with the intention of being unconscious and unrousable when her father came to take her to Australia the following morning. Yet she escaped home and went to Friar's house, taking the anaesthetic only to wake up some eleven hours later and discover Romeo's corpse. While the propofol served its purpose in that Romeo mistook her for dead, in terms of the story a beat was missed -- the purpose was supposed to be that Juliet would be able to escape her father's wishes, yet he didn't seem to feature much at all (apart from a very odd and disjointed couple of tweets from Tybalt's account) -- realistically she could have run off to Friar's without the need for the potion at all, or she should have taken the potion at home so her father could discover her. The finale still doesn't make a huge amount of sense to me and feels slightly rushed.

Yet for every incident where one might question the characters' motives, there was at least one moment of pure inspiration: Romeo's Audioboo dedication to his fallen best friend on Mercutio's memorial day will forever stand out as one of the most heart-breaking things I have ever heard. Each character has alternately had times when they were insufferable and sympathetic -- Friar's turn from philosophical father-figure to drunk-every-night blabbermouth was hilarious and tragic all at the same time; similarly Tybalt's rage against the whole world was interspersed with genuine affection for his big sister during her marathon run, and hope for the future when told he could take over the family business, all to great effect. Juliet's final night before taking her sleeping potion was wonderfully produced, with a series of creepy tweets and pictures showing a glass with less and less propofol in it each time.
Overall I would say the production has been a huge success and I will miss it. I'm not alone in hoping that Mudlark carries out another online production like this in the future. After a slightly lacklustre start the actors really came into their own and successfully portrayed believable and sympathetic characters -- to the point where I and many others would occasionally forget we were watching a pre-determined plot play out, and would desperately try and influence the characters' actions in some way to avoid the inevitable tragedy.

Finally this post wouldn't be complete without a shout-out to the fantastic people I have met through this and will continue to follow on Twitter:

@nantoyara
@HenNaTee
@korearian
@EvaPalazzetti
@adventuresofamy
@bigheadzach
@KatWomanNYC
@judeinlondon
@lumilyon
@dca_80
@FrozenGlitter

Folks - without you my enjoyment of this production would have been greatly diminished.

Big thanks to Mudlark and the RSC and congratulations to the players - can't wait to see what the future holds.

Tuesday, 11 May 2010

Bridge Cameras

0 comments
This post is almost entirely inspired by my bestest friend Imogen, who yesterday emailed me saying her future father-in-law offered to buy her a camera. I love that my geekery is rubbing off on her. The Fuji Finepix range came up as a possible choice, prompting me to research the concept a little for my own education and nosiness.

The term "bridge camera" (aka "megazoom", "superzoom") is kind of an unofficial term used in the photography community to describe cameras which "bridge" the gap between compacts and DSLRs. Key differences between a bridge camera and a DSLR:

- No internal reflex mirror (this one is key! DSLR stands for Digital Single-Lens Reflex)
- No optical viewfinder (due to no reflex mirror) - what you do get instead is an electronic viewfinder
- No interchangeable lenses
- Typically smaller image sensor (not to be confused with megapixel size)


It seems that not all bridge cameras lack the above features though - for example the Samsung NX10 has interchangeable lenses and an APS-C (crop) sized sensor (same as my Sony A230) but is still considered a bridge camera due to no reflex mirror.

Bridge cameras nowadays will appeal to people who want more quality than a compact camera without all the expense and jiggery-pokery of a DSLR. Today's bridge cameras often come with INSANELY long optical zoom lenses - take the Fuji Finepix HS10 which comes with a 24-720mm optical zoom. To put it in perspective, a Nikon 500mm VR lens will set you back at least £5000. That's FIVE THOUSAND POUNDS, folks. As I mentioned in a previous post, optical zoom is much better quality than digital zoom so immediately the HS10 stands out as offering something pretty outstanding for the price.

Now, I can't get into the specific calculations and stuff because, well, it's way beyond my capability, but one of the perceived downsides of a bridge camera is that, even though they do tend to have wide apertures at the wider angles of the lens, the depth-of-field available is not great due to the smaller sensor. This means that unless you specifically position your subject close to the camera and far away from the background, you won't be able to get the blur or bokeh that a DSLR would give you. A shot like the below would not be possible with a bridge camera; the foreground and background flowers would be much more in focus, which means the main subject wouldn't be as well defined:

DSC03861

Some of the reviews I have read of a few bridge cameras also have it that the overall image quality is not as good as with a DSLR, as well as there being a little time lag with the scene on the LCD or electronic viewfinder updating with what's actually happening in front of you - this can make a major difference in sports or any shooting where your subject is moving fast.

My personal opinion is that a bridge camera has a very specific niche market -- someone who wants more versatility than your standard compact camera but isn't interested in or ready to get into the real detail and perfectionism of DSLR shooting. If this is you then a bridge camera is a great and affordable choice, but if you do end up really getting into photography and wanting something that delivers a little more, you'll inevitably make the leap into the full DSLR market.

Saturday, 8 May 2010

New Lens - Sigma 70-300mm f/4-5.6 APO DG Macro

0 comments
In case you didn't know from the number of times I've mentioned it, I got another new lens this week!

The first thing I noticed about the lens is its sheer size and build quality.

New Lens NormalNew Lens - 300mm ZoomNew Lens - Fully ExtendedNew Lens - Fully Extended & Hood

This lens is a bit of a beast compared to my neat-and-petite 50mm. The zoom lens would definitely win in a fight. The build quality is much better as well - it's heavier, with a metal mount instead of a plastic one, and all the parts feel much more robust. The above shots don't really show it, but fully extended with the hood on, it's at least as long as my arm. Considering my camera is one of, if not THE smallest DSLR on the market, it's somewhat disproportionate and makes it really front-heavy.

I mentioned in a previous post what I was intending to use the lens for. I didn't want to wait until France to take it for a test drive, though, so I went for a wander towards the park.

As mentioned previously, this lens has two main functions: zooming in to things further away (duhh), and as a make-shift macro lens.

DSC04068

This was purely a test shot and I was pleased at how close I was able to get. I don't think this is a bad shot and it bodes well for my trip to France; being able to get close enough to the players to make out some decent detail.

In terms of the macro function - it's not a true macro lens as it doesn't manage a 1:1 magnification, but if you zoom in further than 200mm and flick the macro switch on the side of the lens, it allows for a minimum focus distance of 95cm, as opposed to the normal 150cm, meaning you can replicate the close-up shooting of a real macro lens by getting closer to your subject and zooming in really far as well. A real macro lens (for example Sigma's 105mm f/2.8 dedicated macro lens) produces this result by allowing for a super-close minimum focus distance of around 30cm (in combination with the long length).

DSC04042

Me being typically me, I was testing the lens at its extremes, and I was pleased with the results. With the 50mm the closest I could get to these flowers was this:

DSC03504

I like the different perspective the lens offers.

The biggest issue I have with it (and this isn't a problem with the lens so much as me needing to modify the way I shoot) is that you really need a tripod to get a steady shot at the longer end. Every minor movement of your hand is magnified massively when you're zoomed in so far.

What did surprise me more than anything else was how sharp this lens is. Even at 300mm I felt like it was much sharper than my other lenses.

DSC04041

DSC04049

So overall I feel like it was money well spent, and I just need to practise with it so I know its strengths and weaknesses and how best to shoot with it. I also need to take the lens hood out with me and learn when I need to use it; the front glass of the lens is much bigger than my 50mm, and where the 50mm is recessed, this zoom lens is right out there, so there's a lot more potential lens flare. Putting on the hood will mean I need to change settings a little too, so it's all a learning process.

I'm also looking forward to experimenting more with the macro side of things. It offers an interesting perspective on otherwise mundane items:

48/365

You can see that the depth of field on this isn't too bad even though the aperture only opens as far as f/5.6 at 300mm.

So I guess it remains to be see how much this new lens gets used overall, but for now I am very happy with it.